Creating Jobs
Jobs can only be created in PowerDetails by administrators, personnel administrators (only for their assigned employers). Employer users can also create jobs, but these will be submitted as a "request" to be reviewed and approved by administrators before personnel can see it on the calendar.
The following sections will cover how to create a single job posting, how to copy or recur that job, and how to manage job postings in general.
Building Jobs - The Basics
To add a new job/request a job, hover over Jobs on the top menu bar and click New Job. An empty form will appear similar to the one shown below.
Administrator New Job Form

The table below explains the fields under this General tab.
| Field | Description | Administrators | Personnel Administrators | Employers |
| Employer | Name of the employer the job is for. To search for the employer you would like to create the job for, either start typing the name and click outside of the box, or press the […] button next to the Employer field and select it from your list of employers. |
Can select from all employers. |
Can only select from their assigned employer(s). | Defaulted to their associated employer (read-only) |
| Location | Drop-down menu containing the name of the locations listed in this employer's profile. | Can select from all locations within the employer profile | Can select from all locations within the employer profile | Can select from all locations within the employer profile |
| Description | Brief summary of what the job will entail and any specific instructions for personnel. | Required field | Required field | Required field |
| Start/End | Date and time the shift begins and ends. The calendar buttons next to each field may be used to find a date or it can be typed in. | Required field | Required field | Required field |
| Job Type | Drop-down menu of options from your site's Job Types (categories). | Required field, can manage these options. | Required field, can select from available options | Required field, can select from available options |
| Restrict To | Option to restrict this job to only certain Personnel Classes (ranks). When a class is selected, the job will be available only to personnel of that rank or higher (Rank is ordered with 1 being considered the highest). Note that Rank must be defined in your code tables in order for this feature to work properly. | Optional. Can manage these options. | Optional. Can select from available options | Not available |
| Personnel Requested | Number of employees needed to work the job. | Required field | Required field | Required field |
| Lock Status |
Drop-down menu allowing you to customize when employees may apply to this job. You can choose to leave it unlocked (default), manually lock/unlock it, or choose “Locked Until” to enter a date and time the job will unlock. Lock Status is one of the tools PowerDetails uses to keep job distribution fair among personnel. The date/time the job unlocks may be hidden from personnel when using the Always Hide Locked Until Time setting, or when choosing to Randomly Open Cancelled Positions. Note that this is not necessary when Job Sets are being used. |
Optional | Optional | Not available |
| Exclude from Job Sets | When checked, excludes that particular job from any job sets created in your system that would otherwise keep it locked until the designated bidding date/time. | Optional | Optional | Not available |
| Personnel Rate | Hourly rate at which assigned personnel will be paid. If this rate is entered in the employer profile, it will be automatically populated. Leaving the field blank will draw rates from individual personnel profiles, by personnel class, or your standard global rate. See Rate Hierarchy for more information. | Optional | Optional | Not available |
| Billing Rate | Hourly rate at which the employer will be charged. If this rate is entered in the employer profile, it will be automatically populated. Leaving the field blank will draw rates from individual personnel profiles, by personnel class, or your standard global rate. See Rate Hierarchy for more information. | Optional | Optional | Not available |
| Use Unique Billing | These fields will be automatically populated based on the information entered in the employer profile's billing tab. Checking the box will allow you to enter unique billing information for this job to appear on the generated invoice. | Optional | Optional | Optional |
Click Save. The basic information is now saved and additional fields will appear. The following sections will cover these options.
Job Security Tab
The Security tab on the top-left of a job page allows administrators and personnel administrators to specify which groups of people can view and apply for this job. This tab is not accessible to employer users.
The group ALL PERSONNEL is set up by default to contain all personnel users in the system and give them access to newly created jobs. This default can be changed if you wish (see Groups for more information).
If this job is only accessible to certain groups of personnel, click on the security tab on the top left of the job page. Here, we can see which groups can view and apply for this job (again, by default, we have the group ALL PERSONNEL listed).

To modify this group's rights, simply uncheck the Apply checkbox to prevent users of this group from applying to the job, and/or uncheck View to hide it from them entirely.
To give different groups access to this job, click the group icon ![]() on the left panel to view a full list of your groups or begin typing the name in the Add User of Group section
for you to click. With either option, you can then check the Apply and/or View check boxes to the right of the group listing.
on the left panel to view a full list of your groups or begin typing the name in the Add User of Group section
for you to click. With either option, you can then check the Apply and/or View check boxes to the right of the group listing.
Notice the strike-through on the ALL PERSONNEL group below. This means that this group’s access to the job will change upon clicking Save.
Note: Selecting Apply will automatically check View as well. Likewise, unchecking View will automatically uncheck Apply.
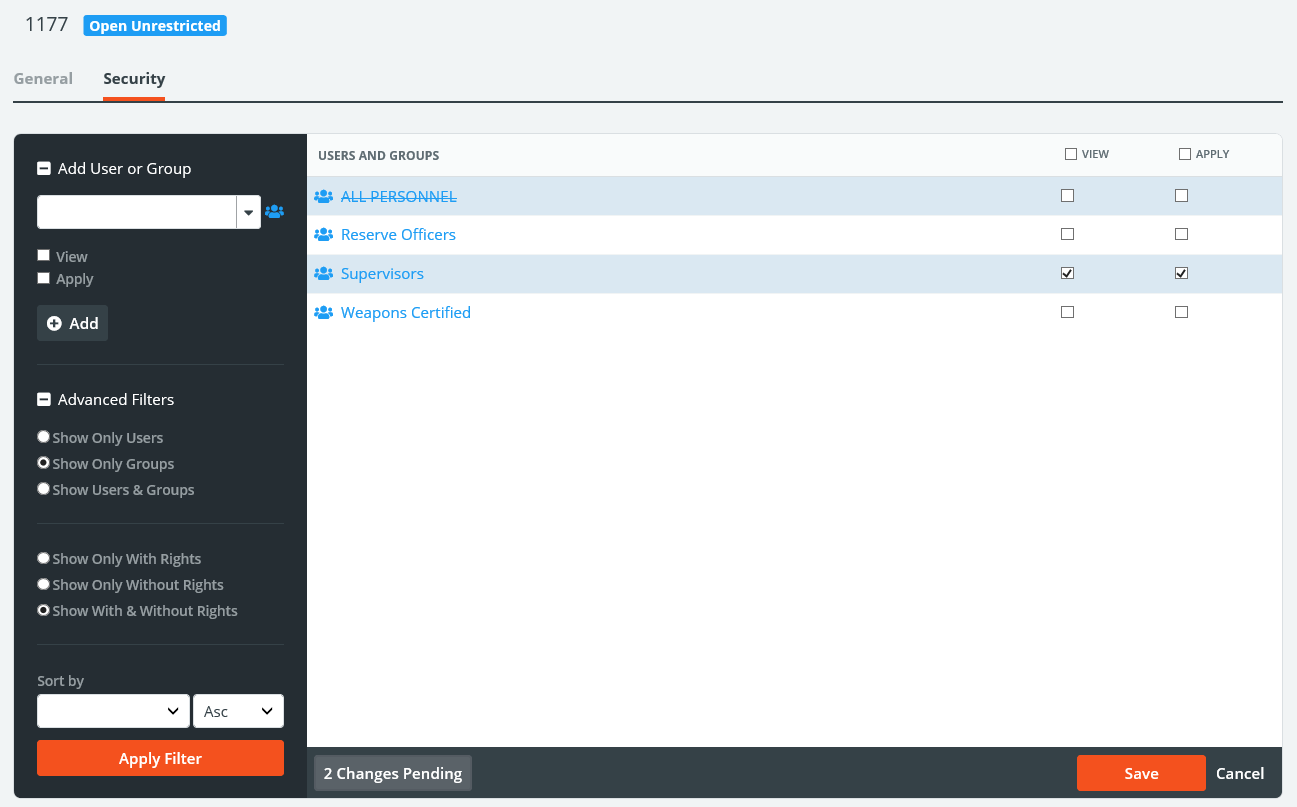
The number next to the Changes Pending button at the bottom of the screen will update to reflect the number of updates in progress. To preview your changes without saving, click this Changes Pending button. Remember, when giving a group security privileges, you are granting those privileges to every member of the group. When finished, click Save.
Updating The Security For Multiple Jobs
If a job is copied or recurred, these security settings will be copied to the newly created jobs. If you have already created the jobs and need to change the security for multiple jobs at once, administrators may do this via each Group's security tab (personnel administrators do not have access to this feature).
Navigate to Advanced on the top menu bar and click Group Search. This will bring you to a list of groups on your site. Click edit next to the group you want to modify job access for and open the Security tab within that group.
Expanding the filter section on the left panel will allow you to search through jobs on the calendar. Click filter to see the results in the right section.

Make any changes needed to the view/apply check boxes and press Save at the bottom to update the group's access to these jobs.
Attaching Files
To attach files such as maps, forms, images of a person of interest, etc. for personnel to access from this job, click to expand the Attach Files section on the job page. Press the Add New File button to upload a new file.
Note: Employer users may not attach files to jobs.

After uploading a file for the first time, you will be able to select it again for another job if you choose. To upload a new file, click the link to Upload from your computer and press Select to locate your file.

Once selected, click the upload button and it will appear in your list of available files. Click on it and press Add to attach it to the job. Your file will now be available for personnel to download the relevant information.
To remove an attached file, simply click remove next to its listing in the Attached Files section.

Overall file management can be done by administrators under the Advanced menu by clicking on the File Management page.

Hovering over the number in the Used column will show which jobs that file is attached to. Click the pencil icon to make any changes to a file's name or to make it automatically attach to any newly create job in the site. Note that you must select to copy the file on any copied or recurred jobs.
Manually Assigning Personnel To Jobs
If you already know who will be working a job or you need place someone on a job, administrators and personnel administrators can manually assign personnel (employer users may only view assigned personnel).
This can be done even if job has already passed as long as the job status is in an editable state (Jobs in the "Closed" and "Billing" statuses cannot be edited since all hours have already been reported).
To assign an employee to a job, locate the Personnel section on the job page. Select a user by taking any of the following actions:
1. Begin typing a name or user ID in the Select Personnel field and click the name of the appropriate listing to select them.

2. Click the drop-down menu to scroll through your list of personnel and click to select a name.

3. Press the […] button next to the Personnel field to bring up the list of personnel in your database. Check the box next to the name(s) of the user(s) you would like to assign to the job. Filtering options are located on the left panel.

After selecting the employee(s) you wish to assign to the job, click the Assign Selected Personnel button.
If the employee(s) you are assigning would not be able to apply for this job on their own due to a scheduling conflict, if they are in violation of a particular rule, or have not reported their hours in the time allowed in your settings, etc. an override screen will appear. If you wish to assign them anyway, check the box to acknowledge and override the warning.

You can additionally check the box to send an alert to let the user know they were assigned to this job. Click Save to complete the assignment. Or click Next to enter additional details or if you need to modify that particular user's times or rates.

Note: Additional manual assignments on filled jobs will assign the user as a Backup.
Personnel Detail Status
An explanation of personnel status is shown below:
| Status | Description |
| Approved | Employee is approved to work this detail. |
| Pending | Occurs when an employee applies for a job and is awaiting approval from an administrator to work this job (manual approval setting). |
| Unapproved | Displays when an administrator has decided to not award the job to the employee (manual approval setting). |
| Backup | Once a job is filled, personnel may sign up/be assigned for a backup position if allowed in your site settings and rules. If the primary (approved) employee cancels out of a job, the backup user will have the opportunity to accept the position. See Applying as Backup for more information. |
| Cancel Pending | If a cancellation is requested within the Restricted Cancellation Period in your site settings, the employee’s status will appear as cancel pending. The requester is only relieved of their primary position when another employee is approved for the open position via application or from a backup position. See Cancelling from Jobs for more information. |
| Canceled | Appears when the employee's cancellation is complete. See cancellation and termination settings for more information. |
| Terminated | Displays when an administrator has removed the user from the job or when a backup employee was not called on to work it. |
| Bill Pending | Appears after the scheduled end time for this employee has passed and they are able to report the hours worked. |
| Billing | Status after employee reports their hours worked (billed the job) and an invoice detail has been generated. |
| No Show | Displays if the employee reports that they did not show up for the detail when reporting hours. |
| Paid | Assigned if an invoice associated with this job is marked as paid or the employee enters in a full payment for the job when billing the job (only allowed for certain invoice groupings). |
Editing Assigned Personnel
Personnel already assigned to the job can be edited to have different times or rates than other assigned users. This can be helpful if a single job was created for a large event and you need to split shifts, or if a certain person (like a supervisor) is going to paid/billed for at a different rate than other people.
To edit an employee's job details, administrators or personnel admins can click Edit next to their name to make the appropriate changes to the date and time they are scheduled to work, or that person's rates. Click Save.
Removing Personnel From A Job
If administrators or personnel administrators need to remove an employee from the job, click Edit next to their name to bring up their specific job detail page.

Enter a comment to record why this person is being removed from the job. Note that this may be required depending on your site settings. Finally, click Terminate (instead of Save) or Terminate from Recurrence if you would like to remove the user from multiple jobs they are assigned to in a job series. On the following page, click the checkbox(es) next to the occurrence(s) you want the employee to be terminated from, then click Terminate.
Once an employee is terminated, it can't be undone. If a mistake was made, you must add them back to the job manually.
Attaching Fees
If your agency charges fees for things like scheduling, vehicle use, or equipment, administrators or personnel administrators may attach these to jobs created on the calendar. It is recommended to set up any fees you will use often as templates so that they can just be selected on the job.
Fees can be connected to a job either as a single entry, or as a template to attach to each employee working the job.
Personnel Fee Templates
When a fee is charged "per person", it is convenient to attach it from within the Personnel Fee Template section on a job. When a fee is attached in this section, it will automatically attach itself to every person assigned to the job, and populates in the above Fees section. This will include any Backups in case they later move to a primary position.
Administrators or personnel administrators can attach a template by clicking the Create Personnel Fee Template button.

Select from your pre-built fee templates that are associated with personnel (meaning that they are "per person") from the Fee drop-down menu.

The fields on the form will then populate with the information stored on your fee template. As long as “Personnel” is selected in the Attach To drop-down menu, this template will attach to every employee who is signed up for the job and to any employee who signs up for the job afterward. Any of the fields can be modified in special circumstances.
After reviewing the personnel fee template, click Save and the template will attach to all assigned personnel in the main Fees section. Note that the Save and Recur button will appear if job is connected to a recurrence series.

If you wish remove the fees entirely click Edit next to the fee template and press Delete. This will remove the template and all of the fees that attached to the employees on the job.
Fees Section
Fees that are a flat rate or are only connected to a single person on a job can be directly attached within the Fees section on a job page by administrators or personnel administrators. Click the Attach Fee button to select from your pre-built fees or to create a custom one.

Below is an example of a fee attached to the “job only” as a flat rate. Note that the Qty field can be adjusted if the hours of the job need to be reflected.

Alternatively, if a fee is to be associated with a single person (for example, this vehicle may only be used by one of the employees working the job), you can select that person specifically in the Attach To section and check the Default To Personnel Hours to ensure that the fee quantity reflects the actual worked hours for this employee.

Click Save and the fee will be listed under the job's Fees section. Notice in the image below that the fee is not attached as a Personnel Fee Template - this is because we only wanted to attach it to Charlie, not every person on the job.

Clicking Edit will allow you to make modifications or remove the fee from the job. If the job is part of a recurrence series, you may have the ability to also add or delete it from the series.