Employer Profiles
When creating a job in PowerDetails, you will first need to indicate the vendor (employer) that personnel will be working for. The following sections will cover how to manage employer profiles in your site.
By default, administrators will have access to build jobs for and create/manage the profiles for all employers. Personnel Administrators will also have this ability, but only for the existing employers that have been assigned to them.
Searching for Employer Profiles
To view a list of the existing employer profiles on your site, hover over Advanced and click Employer Search. All columns on this list can be sorted and data can be filtered on the left panel. Clicking the << arrows will collapse the panel if it is not needed.
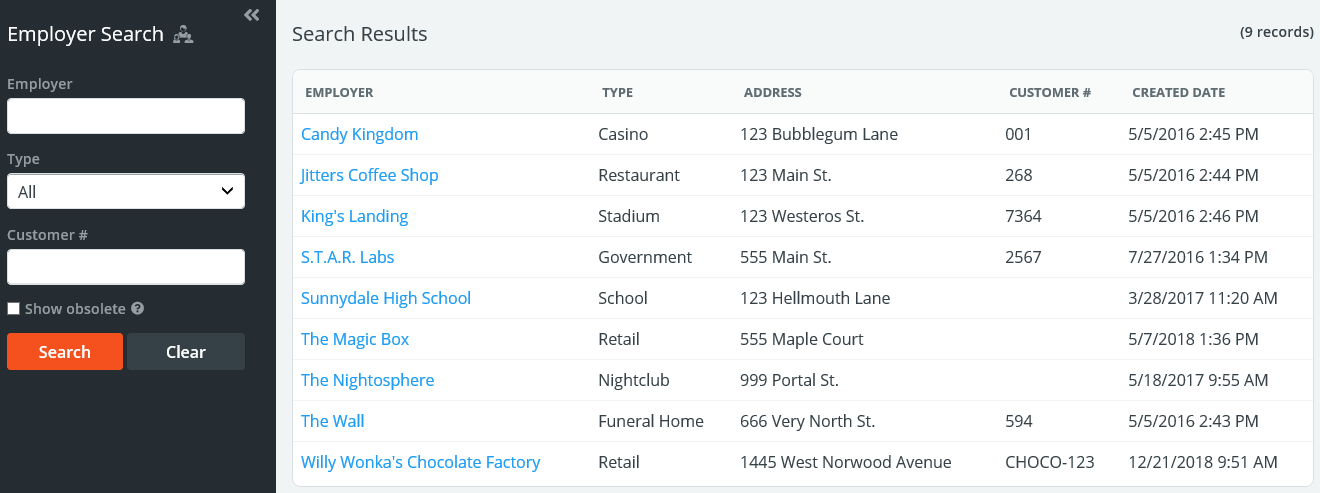
Checking the Show Obsolete box will display any deactivated employer profiles.
Creating Employer Profiles
Administrators can manually create employer profiles in PowerDetails by hovering over Employers on the top menu bar, then clicking New Employer.
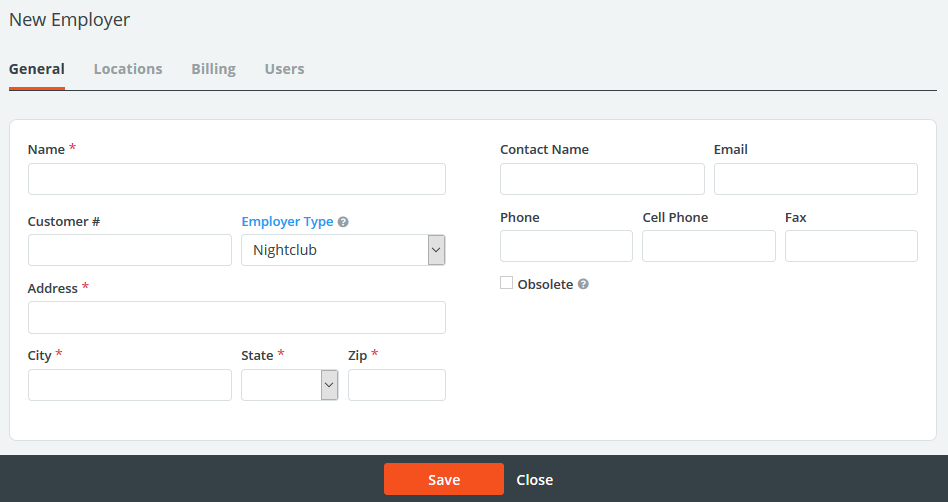
This initial General tab will house the main information of the business or organization your employees are working for. Below is specific information on the fields presented here.
| Field | Description |
| Name | Name of the entity that is hiring your personnel (also known as "customer", "vendor", etc.) |
| Customer # | Optional field to store an internal customer number. This may be required to be a unique entry based on site settings. |
| Employer Type | Defined category of the employer, chosen from a drop-down menu based on your customized Employer Types code table options. |
| Contact Name/Email Phone/Cell Phone/Fax | Optional fields to store information for your main contact at this employer. |
| Obsolete | If checked, this will deactivate the employer profile so no future jobs can be created with it. All historical information will still remain in your site, and you can reactivate the profile at any time. |
Employer Locations
The Locations tab in an employer profiles houses the physical locations where jobs will take place. This tab is especially helpful for franchises or school districts where you are billing to a centralized entity even though employees will work at different places. Locations can also be entered for different assignment areas for large venues. For example, in working at an arena, employees may be stationed at different gates or parking lots. These can all be stored in this tab to select from when creating a job.
To add a location, simply type in a name you would like to use as a reference for this location and the address information. Each time you press save, a new entry line will appear in case you would like to add more later.

Note: Name, City, State, and Zip are required. You may enter any notes you'd like about the location in the Notes field, or render the location inactive at any time by selecting the Obsolete check box.
To edit a location, simply update the information and press Save.
Managing Locations as an Employer User
Employers with a user account can manage the locations that employees will work at by clicking Jobs on the top menu bar and selecting Locations. To add a location or edit an existing one, hover over Jobs on the top menu bar and click Locations.
Employer User View of Locations
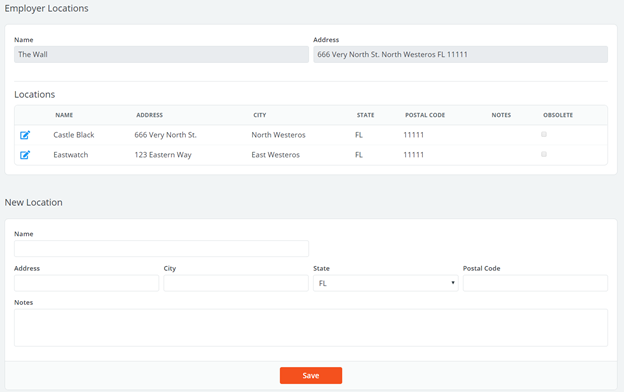
You can add a new location by filling in the fields at the bottom of the page (all fields except Notes are required) and clicking Save.
To edit an existing location, click the Edit icon next to the corresponding location. Make any updates necessary or mark check the Obsolete box if personnel will no longer work there. Rendering locations as obsolete will keep past information on file, but prevent it from being used for future jobs.
Employer Billing Information
To add an employer's billing information, click the Billing tab on the employer profile. A General sub-tab will display with the information that will present on this employer's invoices generated in PowerDetails.
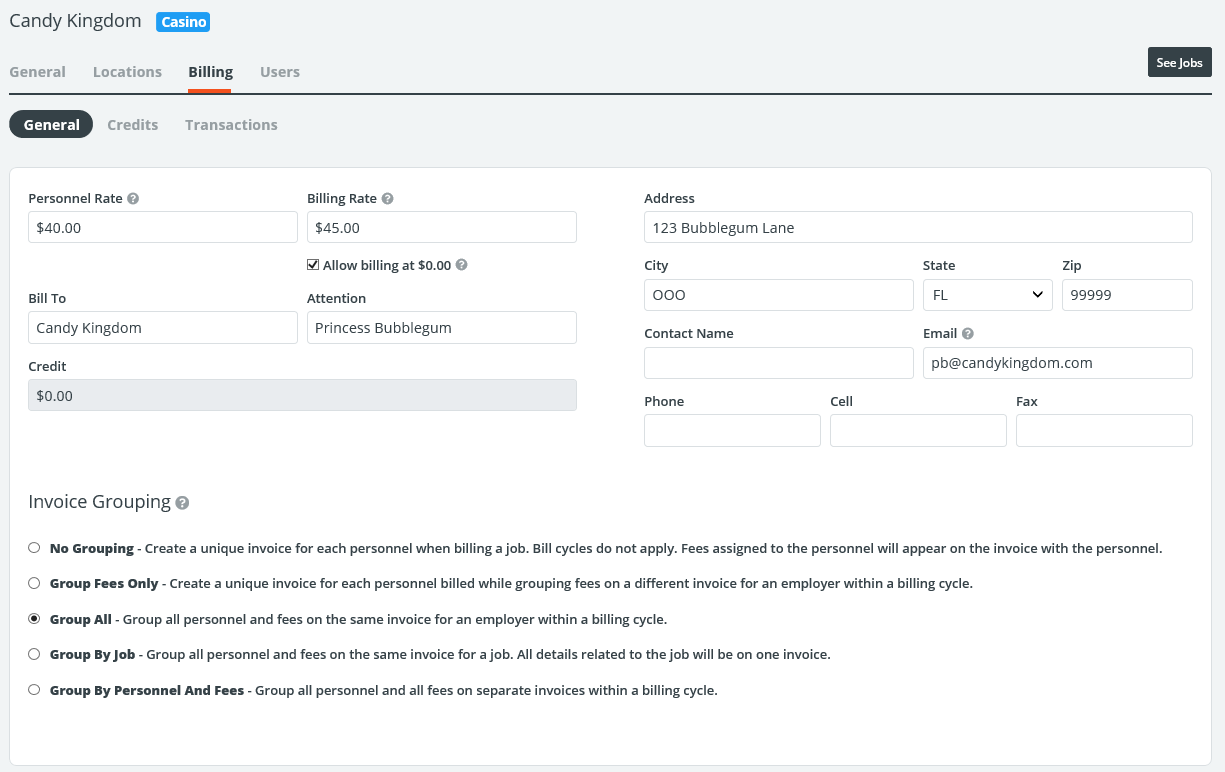
The table below explains the fields General sub-tab above.
| Field | Description |
| Personnel Rate | If you pay personnel at a unique rate that should override entries elsewhere on the site, enter that rate here so it will populate automatically when building a job for this employer. See Rates for more information. |
| Billing Rate | If you charge a unique rate to this employer that should override entries elsewhere on the site, enter that rate here so it will populate automatically when building a job for this employer. See Rates for more information. |
| Allow Billing at $0.00 | Unchecking this box will indicate that jobs for this employer entered with a $0.00 billing rate should be used for scheduling purposes only. Personnel will not be prompted to report hours in this case. |
| Bill To | Billing name of the employer as you would like it to appear on an invoice. |
| Attention | Name of a person or department that invoices should be directed to. |
| Contact Name | Name of the actual billing contact. |
| Credit | Remaining credits (entered manually or via over payments from invoices) for this employer that can be applied to invoices generated in PowerDetails. |
Invoice Grouping
The Invoice Grouping section allows you to choose how you would like to consolidate jobs on invoices within a period of time established by your site billing cycle.
| Invoice Grouping | Explanation |
| No Grouping | Useful when personnel are paid directly by this employer. Generates a unique invoice per person for easy management. |
| Group Fees Only | Useful for when personnel are paid directly by the employer, but you need to send a separate invoice containing fees owed. Fees will group on an invoice according to the bill cycle established in your site settings. |
| Group All | Compiles all personnel and fees on a single invoice from within the bill cycle established in your site settings. |
| Group by Job | Generates a unique invoice per individual job entered on the calendar containing all personnel and fees assigned. |
| Group by Personnel and Fees | Similar to the Group All setting, but will generate one invoices containing all the personnel and one invoice containing all fees (two invoices total). |
See Invoicing and Correcting Billing Mistakes for more information.
Employer Credits
Credits (including prepayments or beginning balances) can be stored in an employer profile when an administrator creates one manually in the Credits tab or when an over-payment has been entered on an invoice. Credits can be applied to any existing invoices.
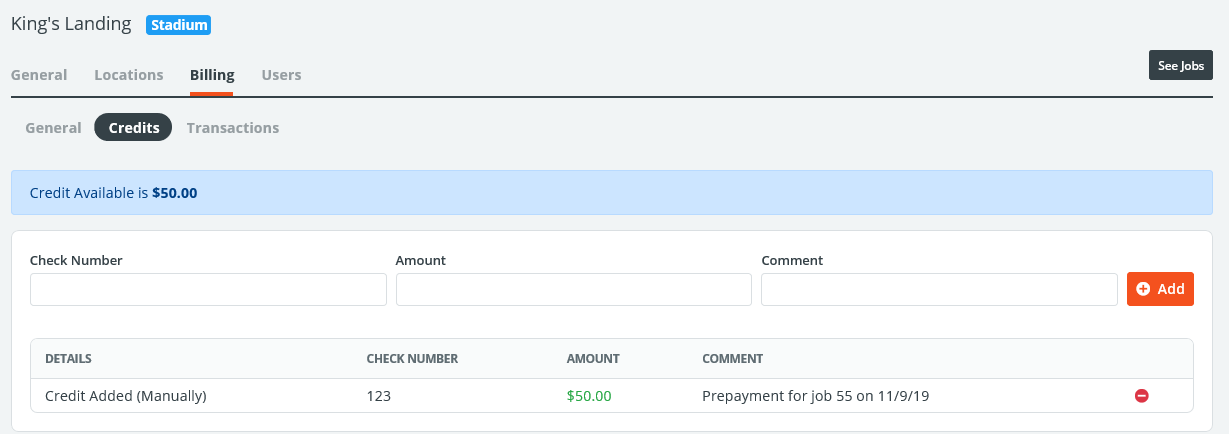
To enter a manual credit, fill in the check number, the credit amount, a comment such as the job ID and date, then click Add. To remove a credit from an employer's record, simple click the Remove icon next to the appropriate credit.
Any over-payments entered on an invoice will automatically added to the credits available for this employer.
Note: If an over payment is entered by mistake, you must visit this page to remove it before re-entering the correct payment on the invoice. The Credits tab is only accessible to Administrators.
Transaction History
The Transactions sub-tab keeps a running history of every monetary transaction within the account.
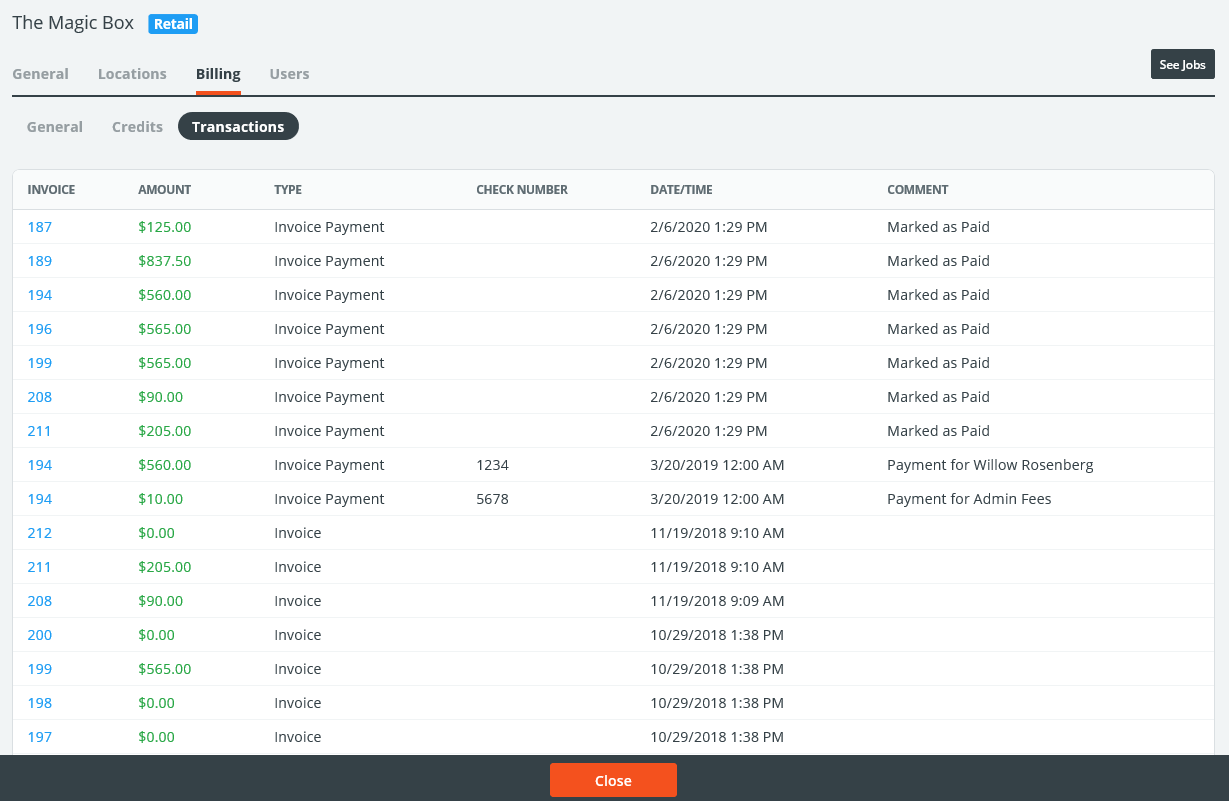
Deleted transactions will show in red here. To view history for a singular invoice, click on the invoice ID to be brought to the main invoice form. See Invoicing for more information.
Note: The Transactions tab is only accessible to Administrators.